CSS Art – How to Make a Simple House
Let’s make a simple house using CSS and HTML. We'll break down the house into basic shapes. Step by step guide, showing you how to make CSS Art.
Introduction
This article is beginner level. This article will guide you step-by-step on how to create a simple house image using CSS and HTML.
We don’t assume prior knowledge of CSS or HTML, but it helps if you have some familiarity with how they work. We assume that you have set up tools to create CSS art. If you haven’t set up your tools, this article below will show you how to set them up.
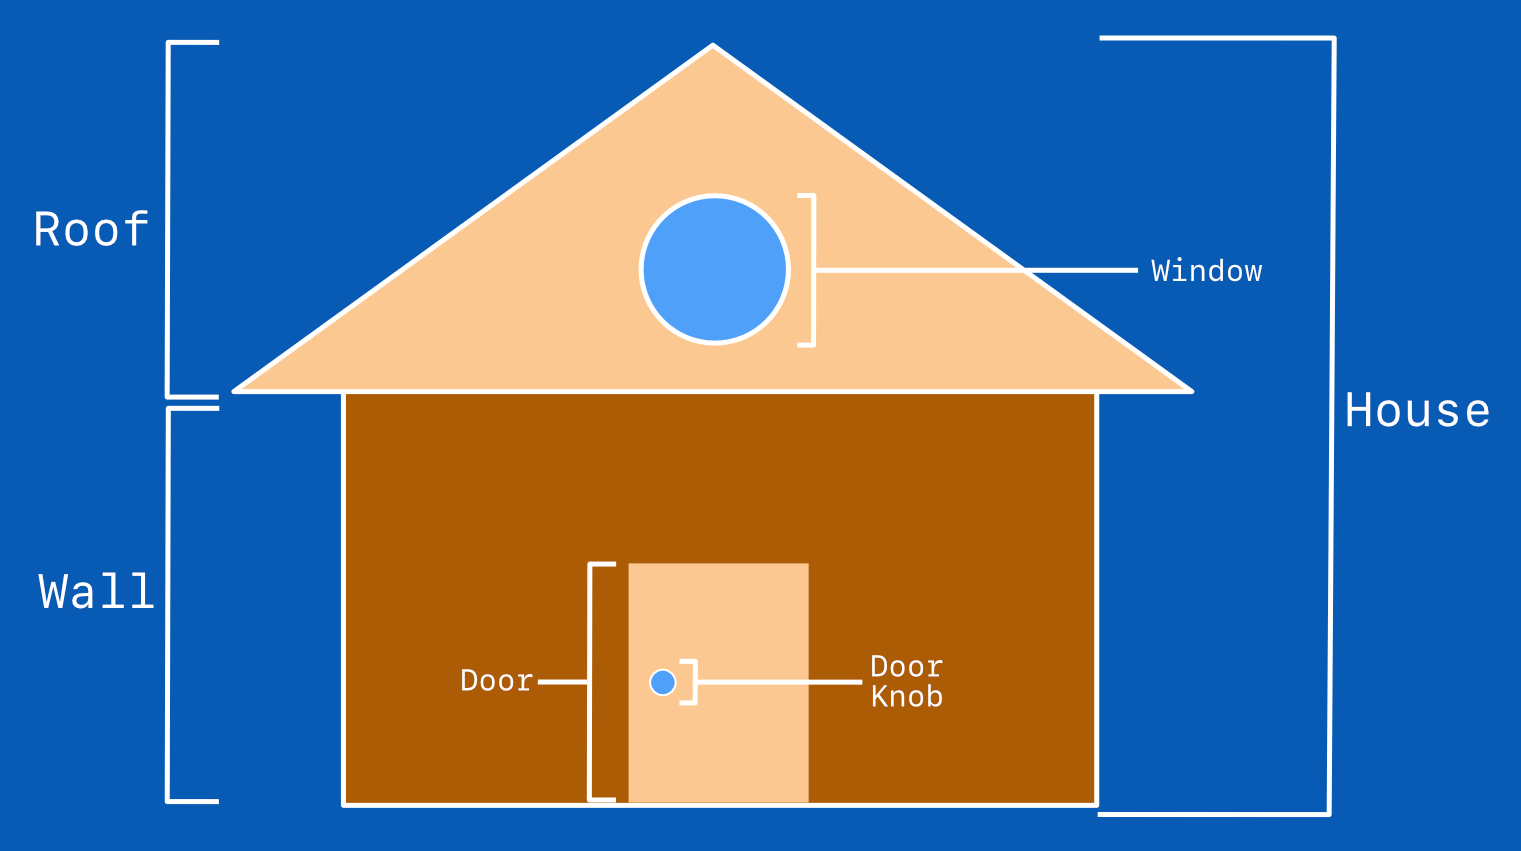
Simple House Preview
This is the image we will be creating. It’s a simple house. This article will show you how to make this image with CSS and HTML.

Before we start coding, let’s break down the image. If you look at the image closely, you’ll notice it’s composed of basic shapes. You should see a rectangle, circle, and a triangle. The shape sizes may differ, so does their color. But in essence, by combining simple shapes, you can make more complex objects.
Let’s break down the different parts of the house.
- Roof
The basic shape of the roof is a triangle. - Window
In the middle of the roof is a circular window. - Wall
The house wall is a large rectangle. - Door
A small rectangle shape. - Door knob
The door knob is a small circle.

We’ll make the basic shapes with CSS and HTML. Let’s work on the HTML section first.
If you don’t have a good grasp of CSS and HTML basics, check this article.
 Pyxofy
HTML and CSS primer for CSS Art article
HTML Code Breakdown
Here’s the full HTML Code.
<!doctype html>
<html lang="en"> <!-- HTML element -->

<head> <!-- Head section -->
  <meta charset="utf-8">
  <title>CSS Art - Simple House</title>
  <meta name="viewport" content="width=device-width, initial-scale=1">
  <link rel="stylesheet" href="styles/styles.css">
</head>

<body> <!-- Body section -->

    <!-- CSS art code here -->
	<div class="house">
		<div class="roof"></div>
		<div class="window"></div>
		<div class="wall"></div>
		<div class="door"></div>
		<div class="door-knob"></div>
	</div>

</body>

</html>
Let’s break the HTML code and explain how it works.
<!doctype HTML>- doctype.
For your web page to render properly in the web browser, you need to insert this at very the top of your HTML document. This is a necessary preamble.<html></html>- HTML element.
This is the main element for the document. It tells the web browser the document is formatted in HTML.
This code,<html lang="en">tells the browser that English (en) is the language used for the document.<head></head>- Head element.
Next is the<head>element. We put meta tags, CSS links in this section. Besides the information within the<title>tag, most information inserted within this element will not show in the rendered website that the user will see.<meta charset="utf-8" />- Meta element.
This element tells the browser to render the characters within the document in Unicode Transformation Format – 8 (UTF-8). UTF-8 includes most characters from the vast majority of written languages. Make sure to include this element if you want your characters to render properly. The Unicode Consortium maintains the UTF-8 standard.<title></title>- Title element.
Text inserted between this element will be the title of your web page. Title appears in the web browser tab and used when you bookmark the page.<meta name="viewport" content="width=device-width, initial-scale=1">Viewport meta tag.
You use the viewport meta tag to optimize web pages for mobile browsers. Check this Mozilla Developer article for more details about this tag. This tag ensures your CSS art renders properly on mobile devices.<link rel="stylesheet" href="styles/styles.css">- Link element.
This is to link our external CSS stylesheetstyles.csslocated in thestylesfolder.
Check the below article for step-by-step instructions on how to set up an external CSS stylesheet.
Pyxofy
Setting up tools for CSS Art article
<body></body>- Body element.
Any information inside the<body>element will be shown to the user. You can put text, images, video, audio, games and different types of media in this element. Our CSS art code will go in to this section.
You can dive deeper on HTML elements in this article. Now that we know the general HTML, let’s go over the HTML elements specific to creating our CSS art.
Within the <body> element, we have a bunch of Content Division (<div>) elements.
<!-- CSS art code here -->
<div class="house">
	<div class="roof"></div>
	<div class="window"></div>
	<div class="wall"></div>
	<div class="door"></div>
	<div class="door-knob"></div>
</div>
Each <div> has a class attribute. For example, to create a <div> with a class attribute of house, we type <div class="house">. Remember, HTML attributes needs to be in the opening tag.
The <div class="house"> acts as a wrapper for the rest of the Simple House parts. To complete the HTML, all you must do is create more <div> elements for the roof, window, wall by indenting them within the house div.
Now that we have completed the HTML portion, let’s go over the CSS side. We’ll go step by step on how each CSS ruleset works.
Create Simple House – Step-by-step
Are you ready to start creating your first CSS art? In this section, we’ll break down the CSS code to create the Simple House. The CSS code will go within your external stylesheet. For this article, we’re using styles.css located in your styles folder.
Step 1: White Background
After you set up the HTML file and finish linking your external stylesheet, you will get a white background, like this.

We won’t go deep explaining the CSS ruleset targeting the <body> element in this article. At this point, you want to remember that this code “centers” the CSS art in the web page. Go to this article if you want more details about CSS Flex Container.
CSS code:
body {
  margin: 0;
  padding: 0;
  height: 100vh;
  display: flex;
  justify-content: center;
  align-items: center;
}
Next, let’s make the background blue with a light gray border.
Step 2: Blue Background, Gray Border
To get the blue background and light gray border, let us target the <div> element with house class attribute.

CSS code:
.house {
  width: 500px;
  height: 421px;
  border: 5px solid lightgray;
  background: royalblue;
  position: relative;
}
Before we set the CSS properties, did you notice the period (.) before the CSS selector? We didn’t need this when we targeted the body HTML element. The period (.) tells the web browser that we’re targeting an HTML element with the class attribute. Check and bookmark this article for an exhaustive explanation of CSS selectors.
Let’s set the width and height properties.
- We set the
widthproperty to500px. - The
heightproperty we set to421px.
Next, let’s set the light gray border.
- We make the light gray border with
border: 5px solid lightgray;. The border is5pxthick,solid, and we set the border color property withlightgray. For the code to work, make sure you have a space between the all three property values.
Let’s set the background color and position property.
- To get the blue background, we set the
backgroundproperty toroyalblue. - Last, we set the
positionproperty torelative.
We finished the background. Next we’ll work on the brown wall.
Step 3: Wall

CSS code:
.wall {
  position: absolute;
  width: 370px;
  height: 200px;
  border: 2px solid white;
  background: sienna;
  left: 65px;
  top: 193px;
}
Besides the properties we set in the previous section, we will set left and top properties. This will position our brown box accurately within the blue background.
- Set
leftto65px. - Then set
topto193px.
Another change from the previous section is we’re setting position to absolute not relative. absolute property value positions the brown wall within the blue background.
Now that we have the wall all set, let’s draw the door.
Step 4: Door

CSS code:
.door {
  position: absolute;
  width: 86px;
  height: 117px;
  background: burlywood;
  left: 207px;
  top: 279px;
}
The width and height controls the size of the door. You can change the door size, or even add another door if you want. Play around with the CSS code.
The next step is drawing the door knob within the door.
Step 5: Door Knob

CSS code:
.door-knob {
  position: absolute;
  width: 10px;
  height: 10px;
  border: 1px solid white;
  border-radius: 50%;
  background: dodgerblue;
  left: 217px;
  top: 328px;
}
To create a circle, width and height has to be the same value. border-radius is the new property in this code. border-radius controls the borders of square shapes. Setting it to 50% transforms the square to a circle. Try to change the border-radius to different values. When you set it to 10%, what does it look like? How about at 80%?
Now that the wall and door are complete, let’s work on the roof and window.
Step 6: Roof
